
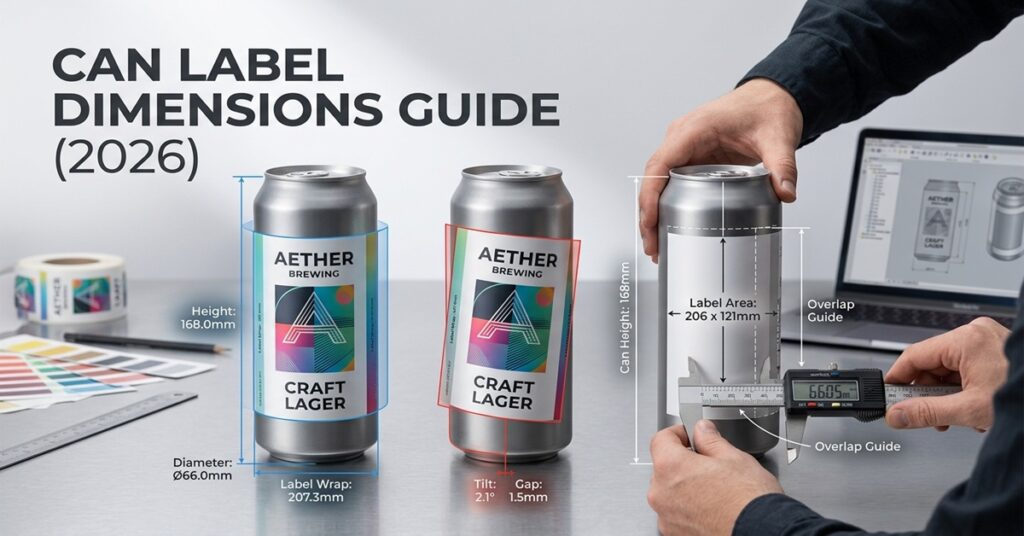

Can label dimensions are one of the most underestimated factors in packaging design yet they directly influence how a product looks, feels, and performs in the real world. Whether you’re designing beer cans, energy drinks, sparkling water, or specialty beverages, even a few millimeters of miscalculation can lead to misaligned graphics, production delays, or expensive reprints.
In modern packaging workflows, can label dimensions are not just a design concern they are a manufacturing requirement, a branding strategy, and a technical constraint all at once.
This in-depth guide breaks down everything you need to know: from industry-standard measurements and geometry principles to real production challenges, compliance rules, and expert design strategies used in professional packaging studios.
Understanding Can Label Dimensions: The Core Concept
What Are Can Label Dimensions?
Can label dimensions refer to the exact width and height measurements of a label designed to wrap around a cylindrical container, such as an aluminum beverage can.
They consist of two primary components:
- Label width: The horizontal measurement that wraps around the can’s circumference
- Label height: The vertical coverage from top to bottom of the can surface
Unlike flat packaging, can labels must conform to a curved surface. This means that accuracy depends not only on design but also on geometry, material behavior, and manufacturing tolerances.
A label that looks perfect on a flat screen must be mathematically adjusted to fit a cylinder in the real world.
Anatomy of a Beverage Can Label
To understand can label dimensions properly, it’s important to break down how a label interacts with the physical can.
Key structural zones:
- Wrap Area: The full printable surface that covers part or all of the can
- Visible Area: What consumers actually see when the product is on a shelf
- Seam Area: The point where label edges meet or overlap
- Bleed Area: Extra design space (commonly 0.125 inches) to prevent white edges after trimming
- Safety Zone: Inner margin (often 0.25 inches) where critical text and logos must remain
Each of these zones ensures that the final printed product looks clean, aligned, and professional.
Why Precision in Can Label Dimensions Matters
Small dimensional errors can create major production issues.
Common problems include:
- Wrinkling or bubbling during application
- Misaligned seam edges
- Cropped logos or distorted typography
- Ink misregistration on curved surfaces
- Full production reprints due to sizing mismatch
In high-volume beverage production, even a 1% error in label sizing can translate into thousands of wasted units.
In packaging terms: precision is not optional it is financial protection.
Standard Can Label Dimensions in the Industry
Common Beverage Can Types
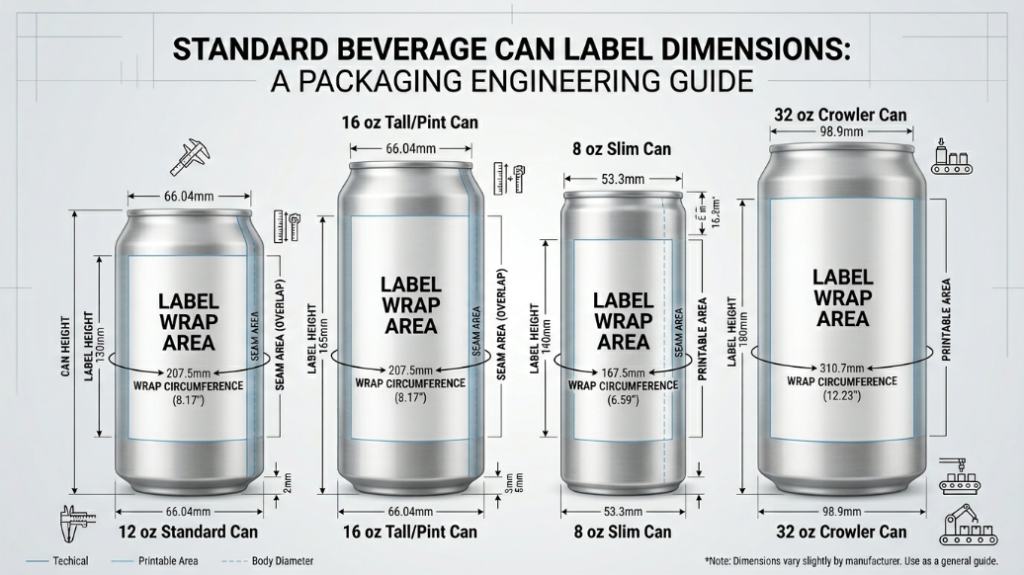
Different beverage formats require different label sizes because can diameters and heights vary.
The most common types include:
- 12 oz standard cans (most widely used in beer industry)
- 16 oz pint cans (popular in craft beer)
- 8 oz slim cans (energy drinks and premium beverages)
- 32 oz crowlers (large-format cans)
- Sleek cans (used for modern branding and seltzers)
Standard Can Label Dimensions Reference Table
While exact specifications vary by manufacturer, the following ranges are widely used in packaging production:
| Can Type | Typical Label Width × Height |
|---|---|
| 12 oz standard | 8.0″ – 8.25″ × 3.5″ – 3.75″ |
| 16 oz pint | 4.75″ – 5.25″ × 7.25″ – 7.75″ |
| 8 oz slim can | 2.0″ – 2.5″ × 7.5″ – 8.25″ |
| 32 oz crowler | 5.75″ – 6.25″ × 9.5″ – 10″ |
These are not absolute values but industry benchmarks used in most production workflows.
Wrap Styles and Their Design Impact
Can label dimensions also depend on how much of the can you want to cover.
Partial Wrap
- Covers only a portion of the can
- Often used for minimalist branding
- Lower material and printing cost
Standard Wrap
- Covers most of the can circumference
- Balanced between branding and cost efficiency
- Most common format in commercial beverages
Full Wrap
- Covers nearly the entire cylindrical surface
- Provides maximum space for storytelling and visuals
- Requires precise alignment and high-quality printing control
The Science Behind Can Label Measurements
Understanding Can Geometry
At the core of can label dimensions is a simple geometric principle: the relationship between diameter and circumference.
For any cylindrical object:
C = π × d
Where:
- C = circumference
- d = diameter
- π ≈ 3.1416
A typical beverage can uses standardized diameters such as 211 or 207 formats.
For example:
- A 211 can has an approximate diameter of 2.6875 inches
- Circumference ≈ 3.1416 × 2.6875 ≈ 8.44 inches
This value determines the maximum label width before subtracting tolerance gaps.
207 vs 211 Can Standards
One of the most overlooked issues in packaging design is the difference between 207 and 211 cans.
211 cans:
- Slightly wider diameter
- Most common in modern beverage production
- Better stability and stacking strength
207 cans:
- Narrower diameter
- Used in some legacy or specialized production lines
Even a small diameter difference affects circumference, which directly changes can label dimensions.
A label designed for a 211 can may not wrap cleanly on a 207 can, leading to:
- Overlapping seams
- Excess tension
- Visual misalignment
Why Labels Don’t Use Full Circumference
In real-world production, labels are never cut to exact circumference. A small gap is always included.
Typical gap allowance:
- 0.125 to 0.25 inches
Reasons include:
- Preventing label overlap at the seam
- Allowing room for machine application variation
- Reducing bubbling caused by over-tension
- Ensuring smooth application on high-speed filling lines
How to Calculate Can Label Dimensions (Step-by-Step Guide)
Paper Mockup Method (Practical Testing Approach)
One of the simplest ways to validate can label dimensions is a physical test:
- Wrap plain paper around the can
- Mark where the edges meet
- Measure overlap or gap
- Adjust measurements accordingly
- Repeat until a clean wrap is achieved
This method is widely used in early-stage packaging design because it reduces production risk.
Professional Measurement Techniques
Packaging engineers use more precise tools such as:
- Digital calipers for diameter accuracy
- Laser measurement systems in manufacturing plants
- Manufacturer specification sheets for validation
Best practice is to measure multiple cans from the same batch, as slight variations can occur even within the same production line.
Label Dimension Formula
A simplified industry formula for label width is:
W = πd − g
Where:
- W = label width
- d = can diameter
- g = gap allowance
Height is determined by:
- Can body height
- Branding requirements
- Safety and compliance margins
Designing Within Can Label Dimensions
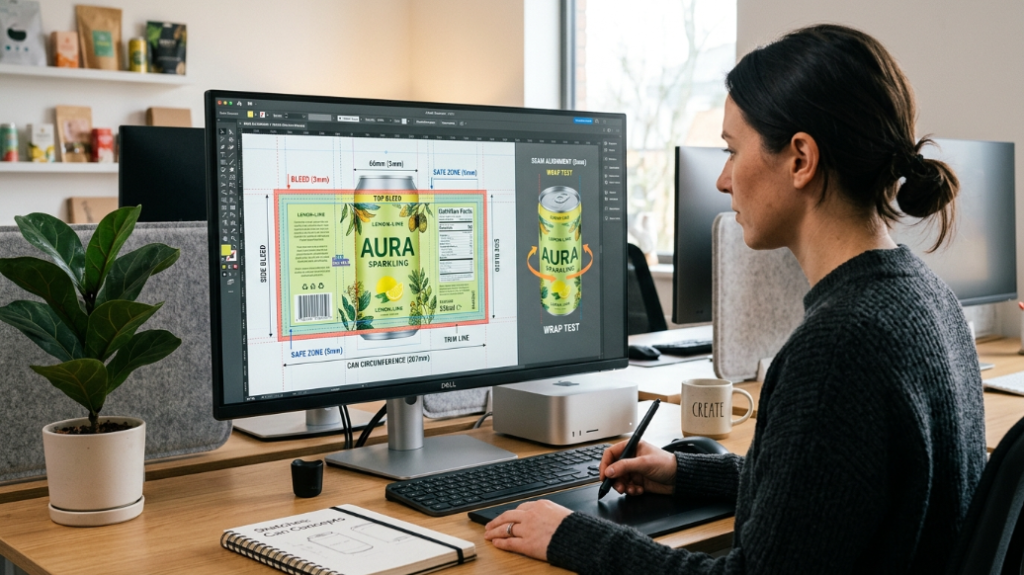
Print-Ready Setup Best Practices
A successful label design must be technically prepared for printing.
Key requirements:
- 300 DPI resolution for sharp output
- Proper bleed (0.125 inches minimum)
- Safe margins (0.25 inches recommended)
- Vector-based file formats (AI, PDF, EPS)
Without these, even correct can label dimensions may fail during production.
Design Strategy for Shelf Impact
Effective packaging design follows a visual hierarchy:
- Logo placement in the upper third for visibility
- Product name centered or slightly elevated
- Supporting text (flavor, type) below primary branding
- Compliance and legal text at the bottom
Because cans are curved, edge distortion is a major concern. Designers often compensate by slightly adjusting artwork alignment at the seam.
Color Behavior on Metallic Surfaces
Metallic cans (aluminum) significantly affect color perception.
Key observations:
- Silver cans increase brightness and contrast
- Gold cans warm up color tones
- Transparent inks allow metallic shine to influence final appearance
This means identical artwork can look completely different depending on can material.
Material and Adhesion Factors That Affect Label Dimensions
Label Material Types
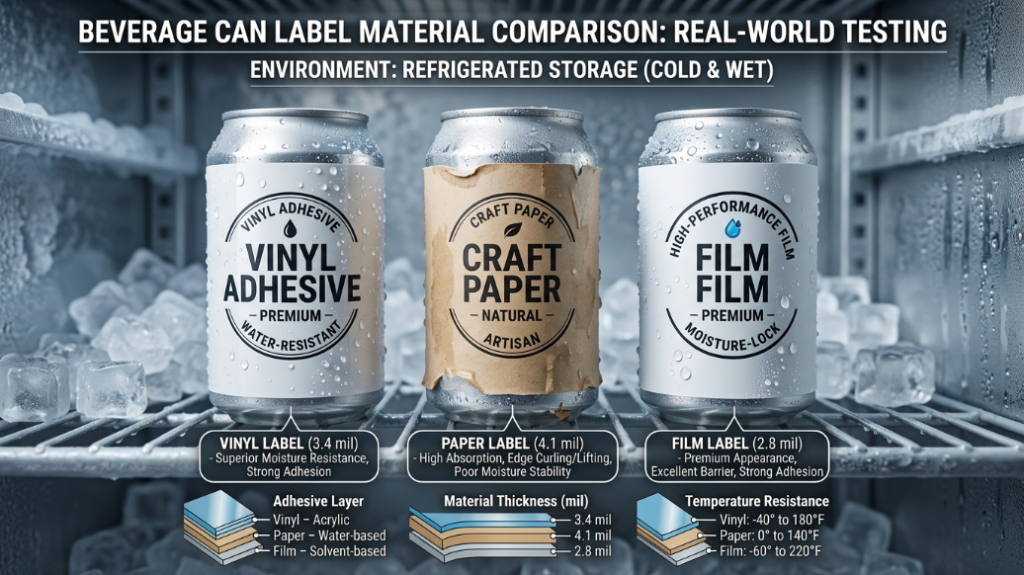
Different materials behave differently when wrapped around curved surfaces.
- Vinyl labels: flexible, durable, ideal for cold environments
- Paper labels: cost-effective but less resistant to moisture
- Film labels: premium finish with high durability
Thickness affects wrapping tolerance and seam alignment.
Adhesive Performance
Adhesives determine how well a label stays attached under real conditions.
- Permanent adhesives: used for long-term refrigeration and retail display
- Removable adhesives: used for promotional or limited-time packaging
Cold storage environments require adhesives that maintain grip below 40°F without peeling.
Environmental Stress Factors
Can labels must survive harsh conditions:
- Ice buckets and condensation
- Refrigerated storage
- Temperature fluctuations during transport
Poor material selection can cause bubbling, curling, or complete label detachment.
Regulatory Compliance and Label Standards
Beverage Labeling Requirements
In many regulated markets, beverage labels must comply with strict guidelines.
Common requirements include:
- Minimum text legibility standards
- Placement of warning statements
- Alcohol content disclosure (for alcoholic beverages)
- Ingredient and nutritional information
These requirements directly influence can label dimensions because they reduce usable design space.
Layout Constraints for Compliance
Designers must balance creativity with legal requirements:
- Front panel: branding and product identity
- Back panel: regulatory and nutritional data
- Seam area: usually avoided for critical information
Ignoring compliance constraints can result in rejected product batches.
Common Mistakes in Can Label Dimensions
Even experienced designers make errors in can label sizing.
Frequent issues include:
- Using incorrect can diameter assumptions
- Ignoring bleed and safety margins
- Misplacing seam alignment
- Overcrowding design elements
- Skipping physical testing before production
The most expensive mistake is skipping prototype testing, which often leads to full production reprints.
Expert Tips for Perfect Can Label Fit
Industry professionals rely on a few key principles:
- Always test physical prototypes before final printing
- Build flexible templates for multiple can types
- Maintain tolerance buffers in every design
- Collaborate directly with packaging manufacturers
- Standardize design systems across product lines
Consistency across SKUs reduces long-term production errors.
FAQs
What are standard can label dimensions?
Standard dimensions vary, but a 12 oz can typically uses a width of around 8.0–8.25 inches and a height of 3.5–3.75 inches.
How do you measure a can for label design?
Measure the can diameter using calipers, calculate circumference using π × diameter, then subtract a small gap allowance.
Why do 207 and 211 cans matter?
They have different diameters, which directly affects circumference and label fit accuracy.
What is bleed in can label design?
Bleed is extra design space (usually 0.125 inches) added beyond trim lines to prevent white edges.
Why is testing important before printing?
Because real-world wrapping involves tension, curvature, and machine variation that cannot be fully predicted in digital design.
Conclusion
Can label dimensions sit at the intersection of engineering accuracy and visual storytelling. A successful label is not just attractive it is mathematically precise, manufacturing-ready, and compliant with industry standards.
Brands that treat packaging as both a creative and technical discipline consistently outperform those that focus only on aesthetics.
In the end, a perfectly fitted label does more than wrap a can it strengthens brand identity, improves shelf presence, and ensures smooth production at scale.